Showing posts with label Patchwork. Show all posts

Monday, 13 May 2013

Nearly Insane Quilt - Draw 7

Here are the latest blocks chosen for my Random Lucky Dip draw, which I use to determine which blocks I will do next in the Nearly Insane Quilt.

36 - 40 - 48 - 92

When I draw my Lucky Dip, I usually go straight to Liz Lois 'Nearly Insane' book, to see what they look like - how 'insane' are they going to be?
'Nearly Insane' Block Pattern book, by Liz Lois
Then I move onto my Electric Quilt software, where I have already drafted out each block - and then I play.  There are so many combinations which I could choose from, I am almost glad I am sticking to  just red and cream!  
Working on Blocks in EQ5 Electric Quilt
Working on Blocks in EQ5
If there is a colour combination that I like, I either save it in my EQ Sketchbook, or simply take a picture of the computer screen on my iPad.  This allows me to compare the different options more instinctively, and once I am making up the block it acts as a quick reference for which fabrics should go where.
One of the reasons I am doing the project in batches, is so that I can get the fabric cut and prepared when I have more time at the weekend, in preparation for 'found moments' during my week, when I am usually working.
Electric Quilt Software Templates
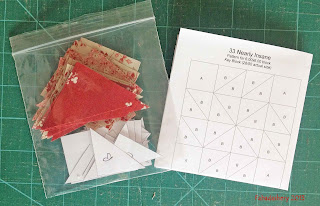
To include in the travel pack, I print off a full size Paper Template for cutting up into templates for each of the pieces, and a smaller Pattern Template sheet, as an indicator of which block I am making.  On the Fabric Template, Electric Quilt has its own indicators for each piece, but before I cut up the Paper Templates for my English Paper Piecing, I often mark which piece belongs to each fabric.  I have also found that if some of the pieces are asymmetrical, it is important to indicate which side is the front.  Once all this is done, I am set to go!

Nearly Insane Travel Packs English paper Piecing
Nearly Insane English Paper Piecing Travel Packs
As I make each draw, I am finding that fabric ‘fashions’ change quite quickly in my workroom.  Sometimes I want modern, sometimes traditional, sometimes I want it busy, sometimes more subdued.  Sometimes the blocks have a greater red influence, others a cream / white influence.  I think under the circumstances, my Lucky Dip works well, as each batch tends to have its own flavour, and by choosing the blocks randomly, they will eventually get mixed up together, rather than rows of what was in vogue at a certain time of making the quilt.  In contrast to my original thoughts, any attempts to make this a sophisticated, and refined quilt have slowly been going out the window, and I am more focussed on using as many fabrics as I can in the quilt. Scrappy is the name of the game!

Monday, 25 March 2013

Nearly Insane Quilt - Cornerstones and Sashing

Cornerstone Sample, Nearly Insane Quilt
Now that I have started gathering a good set of blocks for the Nearly Insane Quilt, I have been putting my mind to the other elements in the quilt.  This past week the cornerstones and sashing have been the focus of my attention.  The original quilt has solid squares of colour at the point where four blocks meet on point, but with such little blocks, I felt it deserved something more delicate.
Cornerstone Sample, Nearly Insane Quilt
Crossed Canoes Block, Nearly Insane Quilt
Using my Electric Quilt 5 software, I searched for a block that would link the corners of the neighbouring blocks and came across this Crossed Canoe Block, which I have slightly adapted by making a completed square in the middle, rather than four triangles.  The cornerstones for the sashing, are just 2" square, and I will need to make 85 in total, plus a further 28 half blocks for the edge. I do like these little blocks, and imagine a quilt made of these, alternated with plain blocks?  As you can see I have only made one, so perhaps ask me about this idea once I have completed the other 84!
Nearly Insane Quilt Sashing 2" x 6", Unbleached Calico
For the sashing I have kept it simple, by just using the unbleached calico for the 2" by 6" strips.  I think there are about 196 of these to do, so I intend to do a few as I go along, rather than a load at the end.  So with the cornerstones, sashing, half blocks and full blocks, this is the layout of how the quilt will be set. 

Cornerstones, Sashing, Blocks Setting, Nearly Insane Quilt
Joining Up with Design Wall Monday

Sunday, 3 February 2013

Mini Hexagon Mug Rug

A Morris Tapestry Moda Fabric Hexagon Mug Rug
A Morris Tapestry, Hexagon Mug Rug
As you would have read in my last post, I have been aching to do some sewing this week, and finally I have managed it. Firstly, thanks to Sarah at Sarah Did It for the gentle nudge and inspiration for this Mini Hexi Project, which has kept me quiet for the past 24 hours. I wanted a little hand piecing project, using the English Paper Piecing method, AND I needed to produce a little birthday gift for this Monday, so this little hexagon Mug Rug fits the bill nicely.
English Paper Piecing Templates using Powerpoint
English Paper Piecing Templates in MS Powerpoint

The other night, whilst doing some work on the computer, I quickly popped into MS Powerpoint and drew up some paper templates. I found that the actual 'hexagon' shape in the package did not have equal length sides, so instead combined six equilateral triangles and some lines to make up the hexagons. The sides are 3cm each.

English Paper Piecing Hexagon Templates
I was travelling yesterday and NOT driving, so I seized the moment to start the project. This meant a rather hurried choice of fabric, so I played safe and went for a fabric range I had in my stash.  I was literally cutting out the fabric with my coat on, and the engine running on the car! 
A Morris Tapestry Fabric, MODA, 8172 8177 8176 8171
A Morris Tapestry Fabric, MODA,
(L-R) 8172-15, 8177-17, 8176-15, 8171-34) 
The fabric I chose was from 'A Morris Tapestry' by Barbara Brackman for Moda. They are reproductions of some William Morris (Arts and Crafts Movement) prints from about the 1890's, featuring the Strawberry Thief and a pretty Daffodil print. I thought this was appropriate because, it was a lovely sunny day here today and a chance to see the progress of the Spring DaffodiI bulbs - little way to go yet!  
Daffodil Bulbs February 2013
Daffodil Bulbs - February 2013
During the hour I had in the car, I was surprised to see that I had covered all my paper templates and that they were ready for stitching together.  I tend to use cheap tacking thread in a contrasting colour and stitch right through the paper.  It is the way I have always done it.  I like this method, as you never know how long it will be before you actually are going to stitch it together when you are hand piecing, so they can sit there for years without a worry.

But this project had to be done today. After a little thought, I decided that the easiest way to construct the little Mug Rug was to do it in columns, this avoided any awkward seams, and you can see here the different stages.
With only tiny pieces, it did not take long to piece together, and in no time at all it was time to take the paper out.  This is a picture of the reverse of the mug rug, after it was stitched together, but with the paper still in place.  I tend to give  projects like this a good press whilst the papers are still in place - I find it helps to keep their structure.

Hexagon English Paper Piecing - Reverse
With the papers removed, I pressed out the seam, and made up a quilt sandwich from some scrap wadding, and some fabric for the reverse.  I just did some simple hand quilting, outlining the shapes. If I am hand piecing and hand quilting an item, I usually like to keep the integrity of the piece by banning ALL machine stitching, but lately, once the top is quilted, I have started to machine stitch the edge, to stay stitch the quilt sandwich, which will then be hidden in the binding. I used a straight edge binding.  Again, for this little project I did use the machine to sew on the binding, and then hand stitched it on the reverse. 

Hexi-Puzzle Mug Rug - English Paper Piecing
The good news is that the gift is completed in time, and that I still have the rest of the day to do some stiching!  If you enjoy hand piecing, especially Hexagons, Sarah Did It has a special Hexi Link Up on the 17th of each month - do be sure to join in!
Today I am linking up with Connie at Freemotion By The River and Crazy Mom Quilts.


Tuesday, 22 January 2013

Bonnie Hunter's Easy Street Quilt - Part 8 Backing

Redundant of having to add borders to my Easy Street Quilt, I moved my attention to the backing.  It's a big quilt, and big quilts need a lot of fabric on the back, as well as the front.  There were no decent sized pieces of fabric left after Easy Street that would do the job, and I was reluctant to buy more fabric, when the project had specifically been a 'scrappy stash buster'.

Fabadashery Easy Street Mystery Quilt Backing
Easy Street Quilt Backing
By the way, 244 quilters Linked Up with their Easy Street Mystery Quilt progress - I bet there were loads more out there working away on their masterpieces. With all the coloured fabric scraps of my Easy Street Quilt still draped around my workroom, it made sense to piece the back together from these pieces. 

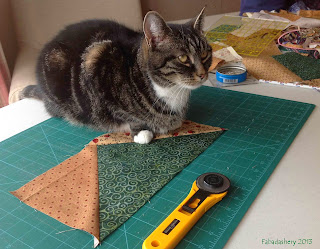
Large Flying Geese Block with Cat
Is now a good time to teach me
how to use the Rotary Cutter?
Working out the sizes for the new sized blocks took a bit of time.  The squares and rectangles were easy enough to size up, but the Flying Geese blocks and Shaded 4 patches were more of a challenge. It really made me appreciate Bonnie's straightforward instructions. I used this opportunity to use the alternate Flying Geese method, using the two different sized squares, instead of cutting strips from triangles.  In addition to this, I decided to swap the red and purple, as I thought I might have preferred on the top.  I also extended the original Block A  outwards by a set of the smaller blocks, making a larger block which can be abstracted from the original Easy Street quilt pattern.  By making the block larger by a row it meant I could use smaller pieces.  I really was at the end of my fabric scraps, and by making the block pieces smaller, it meant I had a more scrappy background.  Going  'large' for the first time has convinced me that a large square cutting ruler from Creative Grids is now a necessity.

I admit I was in two minds about using the left over scraps. Part of me wanted to hold onto them, to use in future projects, then the other part of me felt it was time to move on - the fabrics would be better used in a quilt, than lingering in my stash, going out of fashion. By using them up it would be a good excuse to buy some more.  How do you feel about using up your fabric?

There are a few downsides to this pieced backing approach. With the additional seams, hand quilting is going to be a struggle to say the least, so I guess I have now committed myself to machine quilting the Easy Street quilt . Also, with a mix of lights and darks on the back, choosing a quilting thread colour is likely to involve a lot of deliberation.  I have not even thought about what sort of wadding I will use.

So this is what I have been doing with my time. When we woke up on Saturday, Suzi the cat and I had no idea I we would be piecing another quilt.  It has taken time, but I am pleased with the result. Joining up with Design Wall Monday.


Wednesday, 9 January 2013

Pies and Tarts Quilt - English Paper Piecing

Pies and Tarts Quilt Navy Background Scrap Quilt
Pies and Tart Quilt
Along with piecing my Easy Street Mystery Quilt over the holidays, I have also managed to complete the quilt top for my Pies and Tarts quilt.  This has been a hand piecing project for the past few years, started in February 2011.  The last few bits should have only taken about half a day to do, but Easy Street has rather taken over. When you are hand piecing, completing the top is a major milestone, so I thought I would share this with you.

I was also trying to use my stash and create a scrappy quilt, so I made up some slightly larger cardboard pies and tarts templates from cereal packets, adding on for the seam allowance, for the pies and smaller tarts to draw around for my fabric shapes.  I did a whole 'Pie' and some different sized slices to accommodate some fussy cutting and to use smaller scraps.  I found that a 5" charm square was the perfect size to fit the fabric template for a 'tart'.  As a result of all this circular cutting, a quick sift through my current stash will find fat quarters with awkward round holes in them - no neat strips for this project!

Because I only had a limited number of paper patchwork templates, I tended to cut the fabric in batches, pairing up colour schemes for each circle as I went along.  With a little bag of paper templates, some colourful fabrics scraps, and a needle and cotton, I was on my way.  It travelled with me everywhere, and gradually the Pies and Tarts quilt accumulated.  There are a variety of textured background navy fabrics used in this quilt.

Pies and Tarts Quilt Detail Bright and Navy
Pies and Tarts Quilt Detail

The construction of each block roughly went a bit like this
1. Tack fabric around paper templates
2. Select two sets of four coordinating 'slices'
3. Sew up four pairs of the two colours, overstitching them together
4. Sew the four pairs to make a circle or 'pie'
4. Press the completed circle to ensure a smooth circular edge
5. Applique circle onto a 8" square of navy fabric, removing paper templates as you go.


Pies and Tarts Quilt Navy Background Scrap Quilt
Pies and Tarts Quilt Top Completed
It was only once four blocks were pieced together (by hand, of course!) that it was possible to apply the smaller tart in the middle.  With the verticals and horizontals of the blocks, it was easy to place the circles in the same direction, which adds a diagonal pattern to the whole quilt as well.  I have added half circles to the edge, and to finish the edge I will be adding a very narrow navy border.

At this stage I am joining up with Finish It Up Friday  and HeLP for Hexiaholics - the next stage is to put it away for a while whilst I decide on the quilting pattern I will use, and it waits its turn to be hand quilted ....


Friday, 14 December 2012

#4 Butterfly Quilt - What did I learn from this Quilt?

Each quilt I make, I tend to learn something new.  With the Butterflies Quilt being my first large project, over a long period of time, it was perhaps my steepest learning curve with regard to patchwork and quilting.  Looking back, I realise how naïve I was, and how this project really opened the doors to the quilting world for me.

Butterfly Quilt on the Bed English Paper Piecing
Butterfly Quilt on the Bed


English Paper Piecing is Great!
As long as the paper is cut to the right size, you can get away with rough cutting fabric, and along with hand sewing , you have much greater control of what is going on with your quilt - this is why I love working with the English Paper Piecing method. Also, cutting out the paper for quilts reminds me of cutting out dresses for paper dolls when I was a child.  I used to love this.  It is a quiet, peaceful pastime.  Sometimes I like to be on the machine, but when you have no choice in order to get a project done, it can feel like you are chained to it, and you really have to find a block of time to get the job done - not easy when you work full-time.  In the two years it took to complete the Butterflies quilt, I never once got frustrated with it.  It is portable.  You can fit it in to small gaps of time.  Just make sure you have it with you all the time!
Go With the Scraps
For this quilt project, the only fabric I bought was the cream calico and the fabric for the butterfly bodies.  Otherwise, I kept to what scrap fabric I had.  This led to, what felt like, some heavily compromised colour combinations, which made me wince as I sewed them together.  However, once the quilt was together, it looked perfect.  Go with the scraps, in general, they know what they are doing.
Thread
I used an off-white cotton to sew my pieces together, which worked for the majority of the quilt, but not so well on the coloured fabric.  As it travelled around with me  A LOT, just having to worry about one reel of thread, made it easier, however, with the quilts I have done since I have taken more care to match the thread to the fabric.
Quilting
This quilt needs more quilting.  I look at it every day and think this, but part of me is happy to keep it as it is, as a reminder that there is a ‘tipping point’ of too little, or too much quilting on a quilt.  I am still working on the balance of this.

Friday, 7 December 2012

Easy Street Mystery Quilt - Part 3 Released

Bonnie Hunter has released the third part of the Easy Street Mystery Quilt today.  The weeks sure go fast, but so far I have kept up with the pace.  This week we have to produce shaded 4 -patches.  I have never made these little blocks in my life, but I am using this Mystery Quilt as an exercise in getting my machine quilting skills up to scratch, and so another week, another string to my patchwork bow.

We are allowed to use another colour this week, Turquoise.  I have a different colour scheme, and up until now I haven't finalised whether her Turquoise is my Red or Purple.

Easy Street Mystery Quilt with Cat
Suzi chooses Red for the Easy Street Mystery Quilt

However, it looks like Suzi the cat has chosen for me.  Clearly the one I want will be the one she is sleeping on - so it is Red.  I have loads of Red.  I love Red, and it goes in all my quilts. This one will be no different ....
Suzi is joining in the Feline Friday Link today, so be sure to visit all the Internet Kitties.

Tuesday, 13 November 2012

#1 Butterfly Quilt - Inspiration Behind the Quilt


Butterfly Scrap Quilt Fabadashery
Butterfly Quilt by Frances Meredith
Inspiration
The inspiration for this scrap quilt came from a picture in a quilting book I took out of our local library, early in my quilting journey, about 2003.  The original picture in the book was no more than a couple of inches big, but it was enough for me to work out a pattern for a block.  I like a scrappy quilt, and this quilt used all sorts of fabrics.  At the time, the only patchworking I knew was English piecing, so I made my own paper pattern, cut out all the pieces, and off I went.

History of the Butterflies Quilt
During the period when I was making the quilt, I went to a JOAnn’s store, during a trip to America, where I saw a pattern of the same quilt being sold on the shelves. I guess it was only then that I realised that the quilt I was making already had a history.  Further research when I returned home to the UK revealed that a pattern, and the history of the quilt was published in a book “The New England Quilt Museum Quilts: Featuring the Story of the Mill Girls -Instructions for 5 Heirloom Quilts” by Jennifer Gilbert (Paperback,1999) [NB: Which I notice you can currently access via Google Books].  I discovered that it was originally made in about 1935, by a lady called Nina Shrock, Harvard County, Indiana, USA, using a design by Laura Wheeler. When we were back in America in the Autumn of 2007, we made a pilgrimage to the New England Quilt Museum, in Lowell, where we able to see the quilt on display, the one I had seen originally in my library book, back in the UK.  It was a nice feeling. I now have a pencil with the same butterflies on it, as a memento!

What fabrics did I use?
My creative journey has included dressmaking and embroidery, and it was only in about 2002 that I inherited a collection of beautiful quilting fabric and I considered doing some quilting. Amongst the collection were packets of fabrics, which I later learnt were called Charm Packs.  There were 5” squares, 4“ squares, and tiny 1.5” squares, mainly from a mail order company, Strawberry Fayre based in Chagford in Devon, UK.  I wanted a project that was going to use these up, and the scrappy nature of the quilt, seemed like the ideal choice. 
However, I did notice in the small picture that there were ‘constants’.  For instance, the body of the butterfly was the same for each.  I did not have anything suitable, so I went to my local quilting and patchwork shop, BusyBees, based in the Craft Units at Tredegar House in Newport, Wales.  There I found a brown batik fabric.  I was recommended to give it a wash before I used it. I think that was a good idea.  Otherwise, I didn’t wash any of the fabric – the bits were too small.

There is a whole mix in there.  Ironically, it was only after I had completed the quilt that it was brought to my attention that there were a lot of 30’s reproduction fabrics in it.  This was not intentional, it was serendipity at work.  At the time I didn’t realise what 30’s reproduction fabrics were.  I also have one or two bits of special fabric in there, including the first piece of fabric I ever bought, at the Marldon Apple Pie Fair in Devon, back in the early 1980’s.  You can see details of Techniques and Construction in this post.

Statistics
Dimensions: 243cm x 243cm (approx 8ft x 8ft)
Blocks: 64 blocks, 10” x 10”
Piecing Method: English Paper Piecing. Hand Pieced
Quilting Method: Hand Quilted
Dates: 2004 – August 2006


Awards:
2007 South West Quilters Award for Traditional Quilts, Quilts UK , Malvern
2007 ‘My First Bed Quilt’, Great Northern Quilt Show, Harrogate


#4 Butterfly Quilt - What did I learn from this Quilt?