Showing posts with label reproduction fabrics. Show all posts

Monday 18 April 2016

Doll Quilt Swap, April 2016

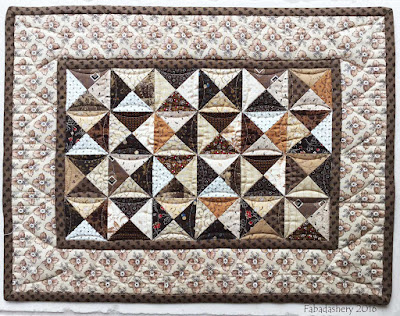
Doll Quilt Swap - Brown Broken Dishes Quilt
It was such fun doing the Humble Quilts Doll Quilt Swap last year that I just had to sign up again this year.  Now that I know my swap partner has received her Doll quilt I can tell you a bit more about it. The reproduction fabrics that are required are about in the UK, just not as abundant as the USA, but with the extra fabric my swappers sent from America last year I had a bit more to play with and went with a traditional country style brown scheme.
Doll Quilt Swap - Brown Broken Dishes Quilt
I went with a broken dishes pattern for the centre which used up most of my brown charm squares and then added some borders. 

Doll Quilt Swap - Brown Broken Dishes Quilt
Doll Quilt Swap - Brown Broken Dishes Quilt Reverse
I am currently reading 'Mastering Precision Piecing' by Sally Collins and so I thought with this small quilt I would take the time to gain more accuracy, based on the tips in her book.  I spun the seams of my triangles and I even chose to mitre the corners on the border.  You will see from the photo that I was as pleased with the back of the top as the front!

Frances Meredith Fabadashery long arm quilting
Doll Quilt Swap - Brown Broken Dishes Quilt
I had hoped to hand quilt this little beauty, but fitting it into my current work plan wasn't happening.  I popped it onto the long arm quilting machine and I had a pleasant couple of hours stitching. As usual posts were popping up on the internet and the Humble Quilts Facebook page of photos of doll quilts which had already been received as part of the swap, which put me into a panic knowing it had to be sent across the Atlantic.  As it happens it only took 7 days for it to arrive, faster than something within the UK takes!

Thanks to Lori at Humble Quilts for organising the swap.
Also a Finish for Whoop Whoop and Crazy Mom!

Sunday 3 February 2013

Mini Hexagon Mug Rug

A Morris Tapestry Moda Fabric Hexagon Mug Rug
A Morris Tapestry, Hexagon Mug Rug
As you would have read in my last post, I have been aching to do some sewing this week, and finally I have managed it. Firstly, thanks to Sarah at Sarah Did It for the gentle nudge and inspiration for this Mini Hexi Project, which has kept me quiet for the past 24 hours. I wanted a little hand piecing project, using the English Paper Piecing method, AND I needed to produce a little birthday gift for this Monday, so this little hexagon Mug Rug fits the bill nicely.
English Paper Piecing Templates using Powerpoint
English Paper Piecing Templates in MS Powerpoint

The other night, whilst doing some work on the computer, I quickly popped into MS Powerpoint and drew up some paper templates. I found that the actual 'hexagon' shape in the package did not have equal length sides, so instead combined six equilateral triangles and some lines to make up the hexagons. The sides are 3cm each.

English Paper Piecing Hexagon Templates
I was travelling yesterday and NOT driving, so I seized the moment to start the project. This meant a rather hurried choice of fabric, so I played safe and went for a fabric range I had in my stash.  I was literally cutting out the fabric with my coat on, and the engine running on the car! 
A Morris Tapestry Fabric, MODA, 8172 8177 8176 8171
A Morris Tapestry Fabric, MODA,
(L-R) 8172-15, 8177-17, 8176-15, 8171-34) 
The fabric I chose was from 'A Morris Tapestry' by Barbara Brackman for Moda. They are reproductions of some William Morris (Arts and Crafts Movement) prints from about the 1890's, featuring the Strawberry Thief and a pretty Daffodil print. I thought this was appropriate because, it was a lovely sunny day here today and a chance to see the progress of the Spring DaffodiI bulbs - little way to go yet!  
Daffodil Bulbs February 2013
Daffodil Bulbs - February 2013
During the hour I had in the car, I was surprised to see that I had covered all my paper templates and that they were ready for stitching together.  I tend to use cheap tacking thread in a contrasting colour and stitch right through the paper.  It is the way I have always done it.  I like this method, as you never know how long it will be before you actually are going to stitch it together when you are hand piecing, so they can sit there for years without a worry.

But this project had to be done today. After a little thought, I decided that the easiest way to construct the little Mug Rug was to do it in columns, this avoided any awkward seams, and you can see here the different stages.
With only tiny pieces, it did not take long to piece together, and in no time at all it was time to take the paper out.  This is a picture of the reverse of the mug rug, after it was stitched together, but with the paper still in place.  I tend to give  projects like this a good press whilst the papers are still in place - I find it helps to keep their structure.

Hexagon English Paper Piecing - Reverse
With the papers removed, I pressed out the seam, and made up a quilt sandwich from some scrap wadding, and some fabric for the reverse.  I just did some simple hand quilting, outlining the shapes. If I am hand piecing and hand quilting an item, I usually like to keep the integrity of the piece by banning ALL machine stitching, but lately, once the top is quilted, I have started to machine stitch the edge, to stay stitch the quilt sandwich, which will then be hidden in the binding. I used a straight edge binding.  Again, for this little project I did use the machine to sew on the binding, and then hand stitched it on the reverse. 

Hexi-Puzzle Mug Rug - English Paper Piecing
The good news is that the gift is completed in time, and that I still have the rest of the day to do some stiching!  If you enjoy hand piecing, especially Hexagons, Sarah Did It has a special Hexi Link Up on the 17th of each month - do be sure to join in!
Today I am linking up with Connie at Freemotion By The River and Crazy Mom Quilts.


Tuesday 13 November 2012

#1 Butterfly Quilt - Inspiration Behind the Quilt


Butterfly Scrap Quilt Fabadashery
Butterfly Quilt by Frances Meredith
Inspiration
The inspiration for this scrap quilt came from a picture in a quilting book I took out of our local library, early in my quilting journey, about 2003.  The original picture in the book was no more than a couple of inches big, but it was enough for me to work out a pattern for a block.  I like a scrappy quilt, and this quilt used all sorts of fabrics.  At the time, the only patchworking I knew was English piecing, so I made my own paper pattern, cut out all the pieces, and off I went.

History of the Butterflies Quilt
During the period when I was making the quilt, I went to a JOAnn’s store, during a trip to America, where I saw a pattern of the same quilt being sold on the shelves. I guess it was only then that I realised that the quilt I was making already had a history.  Further research when I returned home to the UK revealed that a pattern, and the history of the quilt was published in a book “The New England Quilt Museum Quilts: Featuring the Story of the Mill Girls -Instructions for 5 Heirloom Quilts” by Jennifer Gilbert (Paperback,1999) [NB: Which I notice you can currently access via Google Books].  I discovered that it was originally made in about 1935, by a lady called Nina Shrock, Harvard County, Indiana, USA, using a design by Laura Wheeler. When we were back in America in the Autumn of 2007, we made a pilgrimage to the New England Quilt Museum, in Lowell, where we able to see the quilt on display, the one I had seen originally in my library book, back in the UK.  It was a nice feeling. I now have a pencil with the same butterflies on it, as a memento!

What fabrics did I use?
My creative journey has included dressmaking and embroidery, and it was only in about 2002 that I inherited a collection of beautiful quilting fabric and I considered doing some quilting. Amongst the collection were packets of fabrics, which I later learnt were called Charm Packs.  There were 5” squares, 4“ squares, and tiny 1.5” squares, mainly from a mail order company, Strawberry Fayre based in Chagford in Devon, UK.  I wanted a project that was going to use these up, and the scrappy nature of the quilt, seemed like the ideal choice. 
However, I did notice in the small picture that there were ‘constants’.  For instance, the body of the butterfly was the same for each.  I did not have anything suitable, so I went to my local quilting and patchwork shop, BusyBees, based in the Craft Units at Tredegar House in Newport, Wales.  There I found a brown batik fabric.  I was recommended to give it a wash before I used it. I think that was a good idea.  Otherwise, I didn’t wash any of the fabric – the bits were too small.

There is a whole mix in there.  Ironically, it was only after I had completed the quilt that it was brought to my attention that there were a lot of 30’s reproduction fabrics in it.  This was not intentional, it was serendipity at work.  At the time I didn’t realise what 30’s reproduction fabrics were.  I also have one or two bits of special fabric in there, including the first piece of fabric I ever bought, at the Marldon Apple Pie Fair in Devon, back in the early 1980’s.  You can see details of Techniques and Construction in this post.

Statistics
Dimensions: 243cm x 243cm (approx 8ft x 8ft)
Blocks: 64 blocks, 10” x 10”
Piecing Method: English Paper Piecing. Hand Pieced
Quilting Method: Hand Quilted
Dates: 2004 – August 2006


Awards:
2007 South West Quilters Award for Traditional Quilts, Quilts UK , Malvern
2007 ‘My First Bed Quilt’, Great Northern Quilt Show, Harrogate


#4 Butterfly Quilt - What did I learn from this Quilt?