Showing posts with label Charm Packs. Show all posts

Saturday, 12 October 2013

Nearly Insane Quilt - Block 65

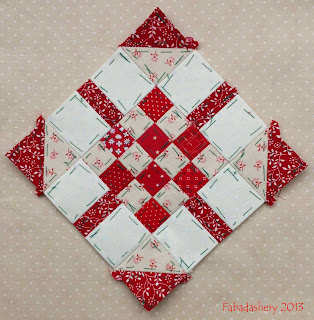
Block 65 - Nearly Insane Quilt
After the 243 pieces of the last block, it was great to whip this block of quickly. Nice big pieces, and easy to put together on the journey to work.  A pretty addition to the pile of sampler blocks that are accumulating.

I am trying to get as many of these blocks done as possible in the next few weeks, as Bonnie Hunter over at Quiltville is, as I write, putting together her 2013 Mystery Quilt, ready for its launch on Wednesday 23rd October.  I did the Easy Street Quilt last year, and had a ball, so the 2013 Mystery Quilt has been pencilled in my diary for quite a while.  Will any of you be joining in?

Midwinter Reds by Minick and Simpson, Moda, have arrived in the UK!
Also, I have been out and about today, and just happened to pop into a LQS, where there was a new display of Midwinter Reds by Minick and Simpson for Moda (did I mention that I met them both in the Spring ...).  This fabric line has been advertised for months and months in the quilt magazines.  It was due in the UK in September, and I have been checking online constantly, so it was a nice surprise to walk into the shop and see all the pre-cuts sitting waiting for me.  I have just bought a charm pack for now, so I can see if any prints in particular are going to need to join the Nearly Insane party.

To celebrate another finished block, I am joining up with Crazy Mom Quilts and Whoop Whoop Friday!

NUMBER OF PIECES: 41
DIFFICULTY: 2/10
SMALLEST PIECE: Square 1/2" (12.5mm) x /2" (12.5mm)

LARGEST PIECE: Pointed Rectangle 2 1/8" (54mm) x 1 1/16" (27mm)
TECHNIQUE: English Paper Piecing (EPP)
FABRICS: 

Cream Bias Check Mama Said Sew by Sweetwater for Moda  #5495 11

Apple Red on Cream Sewing Guide Mama Said Sew by Sweetwater for Moda  #5490 11Cream Pin Dot (Unidentified)
Red dot (unidentified)

Saturday, 23 March 2013

Nearly Insane Quilt - Block 11

Block 11 - Nearly Insane Quilt Fabadashery
Block 11 - Nearly Insane Quilt
Another block has been completed towards the Nearly Insane Quilt. This is basically a log cabin block, and perhaps easier to do if using foundation piecing, but I thought I would give it a go using English Paper Piecing. I know that there are some very similar blocks to come. On this occasion, I think, yes, it would be easier foundation pieced, as I had to squeeze the block together to make sure it finished up at 6 inches.  Also, the red spotty fabric on the very edge is only 1/4 inch wide, so with the two 1/4 inch seams it is already 3 layers thick.  Hopefully I will have forgotton this by the time I decide to quilt it!  In the centre I have used up some strips from some Moda Candy Bars, the Bliss Collection by Bonnie and Camille, using up some more of my red / cream odds and ends.  When I started this quilt, I was thinking I wanted it to look controlled and use just a fixed set of fabrics, but the more blocks I do the more fabrics I want to include, mixing in a wider range of reds. Scrappy is this weeks theme.

Sparky the Cat helping with fabric choices

When I was cutting out Block 11, I had the company of Sparky in the sewing room.  He was happy just to sit and watch. Being older and wiser than Suzi, Sparky knows to keep his tail close to himself when the Rotary Cutter is out.  By managing to fit in a picture of one of the cats, I think we deserve a link with Feline Friday.

Another set of blocks done for Draw 3, time to reach for my Lucky Dip Bowl for Draw 4!  You can see my progress on the right sidebar.

NUMBER OF PIECES: 24
DIFFICULTY: 3/10
SMALLEST PIECE: Rectangle 1/4" (6mm) x 5 1/2" (139mm)
LARGEST PIECE: Square 1" (25mm) X 1" (25mm)
TECHNIQUE: English Paper Piecing (EPP)
FABRICS:
Roc-Lon Unbleached Muslin

Designer Beads (Red) Freespirit for Westminster Fibers
Check The Bias Apple Red #5495-11 Mama Said Sew by Sweetwater for Moda
Red Dot on Cream - unidentified
Hearts on Red (567-R5) Makower
Bliss by Bonnie and Camille for Moda

Friday, 22 March 2013

Nearly Insane Quilt - Block 12

Block 12 - Nearly Insane Quilt Red and White
Block 12 - Nearly Insane Quilt
Introducing Block 12. I like this one.  I will confess that I have slightly altered this block, by reducing the number of pieces in the edge strips, to make the pattern the same on each side. Like Block 92, it was the symmetry issue.   If anyone is following this Nearly Insane Quilt journey for an 'exact' representation, they need to be aware that I like to make my own mark - and I am finding that the urge is growing! 

Initially, I was struggling with the fabric choice with Block 12 until I made the pattern alterations, and then decided to mix it up a bit by using the different red and white charm squares for the centre of the block - the ones which I pulled out from my fabric stash in my original fabric selection.

Red and White Charm Squares - Nearly Insane Quilt
They are only 1 1/2" squares, and I wasn't sure how I was going to incorporate them when I started the project, but I think Block 12 in the Nearly Insane Quilt is perfect place for them.  They were a neat fit over the bits of paper for the English Paper Piecing, and add a scrappy look to the block.  Against the French General fabric, I think they look really cute. 
3/4 " Red Charm Squares, with French General Fabric, Moda  Nearly Insane Quilt
3/4 " Red Charm Squares, with French General Fabric, Moda
I have recently been quilting my red and white pinwheel quilt, and although I like the quilt a lot, looking at just the plain red and the plain white has been a touch boring. It has really made me realise that my heart is with scrappy quilts. In fact, as I laid out these squares, which are only 3/4" square, my mind did wander to the idea of doing a whole patchwork quilt in this layout, in a similar vein to my Single Irish Chain Charm Quilt, but with just 3/4" squares.  It would be a simple quilt, but wouldn't it be lovely, especially in the red and white colourway?

NUMBER OF PIECES: 36
DIFFICULTY: 2/10
SMALLEST PIECE: Square, 3/4" (17mm) x 3/4" (17mm)
LARGEST PIECE: Rectangle 1 1/2" (37.5mm) x 1 1/4" (32.5mm)
TECHNIQUE: English Paper Piecing (EPP)
FABRICS: 
Mix - White on Red Charm Squares
White dot on Cream (purchased from The Shuttle)

White Floral on Red (purchased from The Shuttle)
French General Favourites - Pearl  for Moda #13526 14

Joining up with Finish it Up Friday!

Friday, 8 March 2013

Single Irish Chain Charm Quilt

As I am at the beginning of my Nearly Insane Quilt journey, I thought I would share another of my completed hand pieced, hand quilted marathons with you.  This is my Irish Chain Charm Quilt. It is hand pieced, using the English Paper Piecing method, and hand quilted.


Single Irish Chain Charm Patchwork Quilt
Single Irish Chain Quilt
The start of my patchwork and quilting journey started when I inherited a fabric stash from a friend.  Don't get me wrong, there was plenty of fabric and thread in my life, just not the 100% cottons used for patchwork and quilting.  Some of the little gems in the collection were bags of  small charm squares, which were less than 2" square. 
Fabric Charm Squares, 1" - 2" square
I believe they were from the era before the internet and online fabric databases, when mail order shops would send out small samples for customers to select their quilt colours from.  These little pieces intrigued me, and quietly laid down the gauntlet 'find a project to use us in'An Irish Chain quilt was the solution.  Also, we were expecting the arrival of a camper van, so I decided to make a quilt for use in the van.


Single Irish Chain Quilt Fabadashery
Single Irish Chain Patchwork Quilt
Obviously the size of the charm squares put a limit on the size of my shapes, so each small square was 1" big.  I made up the English paper piecing templates using the Table function in MS Word, where I could set the size of the cells to be 1" x 1", print them off and cut them out.  From the charm packs I selected the deep and warm toned charm squares, which have a jewel like effect, and sought out a light background fabric that would add a subtle texture.  I had already started to cover these little squares with the charm fabrics on the train to work, before I found a suitable background fabric.  In the end I chose a little tan, tone on tone sprig print, "Bound to the Prairie" #9195 by Kansas Troubles for Moda (some of you may be familiar with it - it was the neutral in my 2012 Easy Street Mystery Quilt).  It also matched the woodwork in the camper van perfectly.
Single Irish Chain Quilt - Ideal for a Camper Van!
I remember pouring the squares out onto the shop counter to match up this co-ordinating fabric as the assistant looked at me in disbelief, commenting ,"You do know there is an easier way of doing this, don't you?" Yes, there might have been, but at the time carrying a sewing machine on the train each day was not an option! This portable hand piecing project went with me everywhere, and often or not, a stray square would turn up in the boot of the car, down the side of the sofa - I often wonder how many got left on the train...

Irish Chain Patchwork Quilt
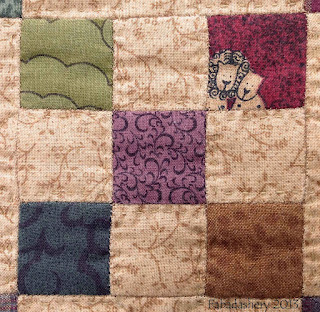
The Single Irish Chain pattern is made up from a 9-patch, alternating the background fabric and the main fabric.  In this case, the 1" squares made up a 9-patch 3" x 3", and that was the same size as the alternating 3" x 3" background fabric square.
Detail of hand pieced 9 patch block Irish Chain Quilt
Detail of hand pieced 9 patch block, Irish Chain Quilt
The quilt is hand quilted, firstly by quilting around the coloured squares, and then by adding a further cross-hatch pattern in the centre.  The border is also cross-hatched.  On this particular quilt, I think this simple quilting pattern works well with the Irish Chain quilt.

Scrappy Border - SingleIrish Chain Quilt Fabadashery
Scrappy Border - Irish Chain Quilt
To add to the scrappy nature of the quilt I decided to make up the binding from further scraps, which are also 3" long.  The background fabric was also part of the Kansas Trouble, 'Back to the Prairie' range.  Up close it is a very pretty print, and although it disguises the quilting stitches on the back nicely, from a distance the colours tend to blend into a muddy colour.  I used a small piece to make a quilt label using my Husqvarna Designer 1 Embroidery Machine, using Isacord embroidery thread.  I didn't use a strong contrasting thread, as I prefer a more subtle label, but it does the trick.

Quilt Label - Single Irish Chain Quilt
This quilt tends to live in the camper van, getting used regularly if we head off on a trip during the winter months.  I love spotting all the different fabrics as I am cosied up in bed!

There are still plenty of these charm squares in my fabric collection, any ideas for the next project?

Joining up with Crazy Mom Quilts.

Statistics
Dimensions: 150cm x 178cm (approx 5ft x 6ft)
Blocks: 3” x 3”
Piecing Method: English Paper Piecing. Hand Pieced
Quilting Method: Hand Quilted
Dates: Autumn 2006(?) – March 2009


Competition Entries:
2009 Traditional Quilts, Quilts UK , Malvern

Friday, 22 February 2013

Fabadashery Blog - 3 Month Anniversary Milestones

Have you seen my post "Bonnie Hunter's Easy Street Quilt - Part 8 (nearly)"?  Reviewing my Blogger Stats recently, I noticed that it has had 2000 hits since it was posted in January.  This past week has been the 3 month anniversary since I started this patchwork and quilting blog, and along with the increase in traffic, a lot of things have happened.

The first event marking this weeks 3 Month celebrations was the arrival of a little parcel from the United States.  It was the Giveaway Prize that Suzi the Cat had won on Feline Friday at Sarah Did It!  Isn't she a clever cat - winning fabric for her owner!  This is the first Giveaway Prize we have won on the internet. These two pieces are from the 'Ivory Cats' Collection by Lesley Anne for Quilting Treasures, and look ideal for a future cat mat project. 

'Ivory Cats' by Lesley Anne, for Quilting Treasures, 2011
There is was also a bar of chocolate in the packet.  Yum Yum.  I was not the only winner though.  Enclosed in the parcel was a special homemade patchwork Cat Nip toy in a Zip Lock bag.  When I opened it I was over the moon for Suzi, not only was there the toy, but also the bag - she loves to chew on plastic.... 
Cat Nip Toy with yummy Zip Lock Bag
Stage 1
Feline Friday Cat Nip Toy
Stage 2
Feline Friday Cat Nip Toy
Stage 3 - FRENZY!
Needless to say - Suzi is CRAZY for it, and loves having it rubbed all over her face. She says thanks especially to Pepper, Midge and Squeaky, the Stars of Feline FridayAlso thanks to their Mum, Sarah for prompting me to sort out my 'No Reply Blogger' status - I hope everyone finds it easier now. 
The celebrations continued when I popped over to the Quilt Room blog.  Pam and Nicky Lintott have made their name through designing and publishing books on Jelly Rolls, Charm Packs, Layer Cakes and other pre-cut fabric bundles, and are in the process of pulling a new book together.  A few weeks ago they had a competition to name one of their quilts for their forthcoming book.   The name I submitted was 'Jet Stream Jewel', and the quilt name was chosen for a Runner's Up Prize!   Not only do I have a £10 voucher to spend on fabric, but they also hope to use the name for one of the other quilts featuring in their forthcoming book.  I can't wait to see it.

So a great Anniversry so far. The concept of blogging is not new to me, but it was Bonnie Hunter's Easy Street Mystery Quilt over at Quiltville, which was one of the main motivators for getting me started on publishing a regular sewing blog. That whole experience of piecing a large quilt by machine, sharing the experience with people all over the world, and being part of the 'Mystery Quilt' phenomenom has been an exciting journey, and has allowed me to plug into the sewing world in a whole new way.

Up until now, most of my patchwork and quilting projects have been by hand, and so their progress is slow, which makes newsworthy moments few and far between - not ideal for an active blog. I am sure the hand stitchers and hand quilters out there can empathise with this.  Knowing that I need to put up a post regularly is a real motivator for keeping my sewing projects on track and making me focus on completing projects.  And most of all I enjoy it.

What have been the highlights of your blogging? I would love to hear about your adventures in the blogging world. 

Friday, 15 February 2013

Broken Dishes Quilt - Cat Mat

Finding useful opportunities for expressing your quilting creativity is sometimes a challenge.  I love making full size quilts, but the backlog of quilt tops that need quilting in my cupboard is a reminder that large projects are not always the most appropriate project to launch into.  A Mug Rug is fun, but to the other extreme, as they can be small and fiddly.  The alternative - the Cat Mat.

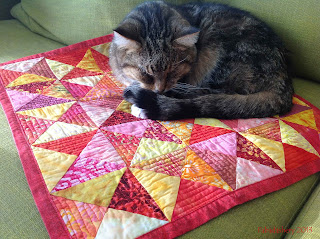
Sparky the Cat on Broken Dishes Pattern Cat Mat Batiks
Sparky the Cat on Broken Dishes Cat Mat
This is Sparky the cat modelling my most recent Cat Mat using the Broken Dishes quilt block pattern.  I enjoy making this size project as I find that the size of a Cat Mat offers more scope to test out new quilting patterns, and to practice some different machine quilting techniques.  Best of all they actually get used, all day, every day, by the cats, as they are placed in strategic places around the house.  Also, they can be thrown into the washer easily.
This particular project used 5" batik charm squares in a mix of yellow, orange, red, pink and purple. The mat finishes up 18" square, with the finished quarter square triangles being 3.5". To create the contrast that builds up the Broken Dishes pattern, I made up some quarter square triangles, pairing up light and dark squares, front sides together.  I then marked a diagonal cross on the lighter fabric, as a guide for sewing.  The dashed lines on the diagram show where I machine stitched the two squares together with a 1/4 " seam allowance, the solid line shows where I cut them, once stitched on the machine.
Quarter Square Triangle Unit Pattern
Quarter Square Triangle Unit
Once sewn and cut, you have sets of light / dark triangles, which then need to be paired up into the squares, which can be seen on the far right of this picture.

Quarter Square Triangles  batik fabric
Quarter Square Triangles - half way through!
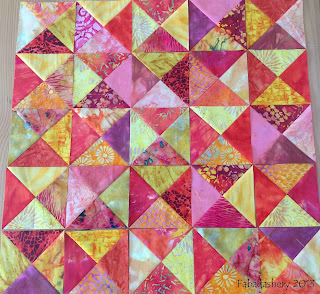
With the squares complete, plan the layout, making sure the lights and darks are next to each other throughout.  I find that taking a picture on my iPhone or iPad at this stage is a useful reminder of the layout, as once I start lifting up the pieces for sewing on the machine the blocks easily get mixed up!

Broken Dishes Quilt Pattern Layout Batik Fabrics
Broken Dishes Quilt Pattern Layout 
For this mat, I backed it with a red fabric, which I cut larger than the final size, so that the backing fabric could be brought forward onto the front for the binding, which I machined in place, after I had quilted the mat. As I said before, these mats are ideal for improving your free machine quilting techniques, and on this one I filled the darker triangles up with a smooth zig-zag pattern, which followed the graduating shape of the triangle.  

Broken Dishes Quilt - Backing and Binding Batik
Broken Dishes Quilt - Backing and Binding
I love the Broken Dishes pattern.  I think it is especially great for using up scrap fabrics, the pattern is quite dynamic, and I particularly like quilts which have the same repetitive pattern throughout.  I don't profess to be ther greatest machine quilter, and I have had no complaints about the quilting so far, but then Sparky's eyesight is not too great ...
 

Saturday, 9 February 2013

Red and Cream Fabric Choice - Nearly Insane Quilt

Now that I have decided to embark on the 'Nearly Insane' quilt, I have spent a lot of time preparing for it.  I will be hand piecing it, probably using the English Paper Piecing method, but I can also see a need to some foundation piecing work for the more intricate blocks.  I have put all the blocks into Electric Quilt 5, and I have also now scanned all my red, white and cream fabrics into the package.  Despite having the Electric Quilt software for years, this is the first time I have done this, and it went relatively well.

Mama Said Sew by Sweetwater for Moda Red and Cream
'Mama Said Sew' by Sweetwater for Moda
The foundations of my colour choice are based on the red and cream colourway in the 'Mama Said Sew' fabric range by Sweetwater for Moda.  As soon as I saw this range, I knew I wanted a piece of it.  Not only is it in a red and cream colourway, but it has an appropriate set of sewing themed fabrics.  I particularly like the little red pinwheels.

Red and White Fabric Charm Squares
I have also gone through all my charm packs, charm squares, and fabric scraps searching for red and cream fabric.  This has included some of the reds from a Bonnie and Camille, 'Bliss' Moda Candy Bar, and some Civil War pre-cut circles I bought at Keepsake Quilting in Meredith, USA, several years ago.  As you can see, nothing is safe - even the tiny little charm squares are in for a shout, especially as a lot of the blocks have very tiny pieces in them.
Red and Cream  White Fabric Stash Fabadashery
Red and Cream / White Fabric Stash

Then finally, the red, cream and white fabrics from my stash.  Lots of red and white spots and dots.  With the project probably taking a few years, no doubt my antennae will be up for red and cream fabrics that are within arms length.

Thursday, 24 January 2013

Fat Quarter Bundle - A Rite of Passage

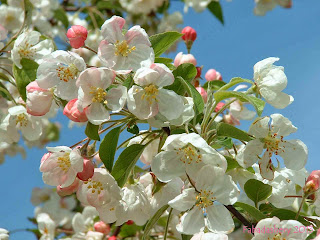
Cherry Blossom at the Keukenhof Gardens
A few years ago, I visited the Keukenhof Gardens in the Netherlands to see the seasonal beauty of their lovely tulip fields. There were thousands and thousands of beautiful tulips on display, and I took loads of photographs of them. I really recommend a trip in March or April if you have the chance. However, of all the pictures that I took on that holiday, it was this picture of the spring blossom which was my favourite.
Sakura Park, Sentimental Studios, Moda Fabric
Fat Quarter Bundle
A late Christmas present (to myself) arrived this week.  This beautiful, Fat Quarter Bundle, Sakura Park by Sentimental Studios for Moda. The range features cherry blossom flowers and petals, and as you can see, the colours of the fabric are almost exactly the same as the picture I took. As a rule, I don't really go for pastel colours, but I was drawn in by the pretty blossom prints on the fabrics, reminiscent of the cherry blossom, when it comes out in the Spring.
I have had charm packs in the past. I have had a Jelly Roll, but a Fat Quarter Bundle, really feels like a 'rite of passage' in my quilting life. I have had it for several days now, and I still have not untied the knot and dismantle this perfect little package. 


Monday, 31 December 2012

Bonnie Hunter's Easy Street Quilt - Part 6

I managed to print off the instructions for Part 6 of Bonnie Hunter's Easy Street Mystery Quilt just before I left for a weekend away on Friday, only to read that we are heading for a Rapid Fire Finish! Being away, I have not managed to sort our Part 6 until today. 
It looked easy, but for some reason I have laboured over it for most of the day.  I think this is partly because I have reached the end of my 'black and white' prints, and the mix is more limited, so I have had to introduce some fabric from my Moda 'Seasonal Little Gatherings' 5" Charm Pack, which has taken longer to cut and sew. 
It was the same for the squares, some of my 'greens' were too narrow, so I was making the triangles up from smaller strips.  However, as you can see, I got there evenutally.
Part 6 Bonnie Hunter's Easy Street Mystery Quilt
Part 6 Easy Street Mystery Quilt
Bonnie has set the release of each part of the mystery quilt for when it is about 11 o'clock in the morning in the UK, so Part 7 has been live for over 7 hours. I have resisted the temptation to look at it before I completed Part 6, so that is where I am heading now.

Friday, 21 December 2012

Blue and White Broken Dishes Quilt Mug Rug


Everyone has been so busy getting quilted Christmas gifts together on their blogs, that now I finally have some time,to myself, I decided to make my first Mug Rug for a gift.


Broken Dishes Quilt Pattern Mug Rug
"I'd Rather Be Quilting" Mug Rug
I have purchased this 'I'd Rather Be Quilting' Mug from Stubbs Mugs, which is a lovely Fine Bone China, printed in blue, so the blue and white combination was the inspiration for the mug rug colour scheme.
I have used a nice Japanese blue and white fabric, with a little floral motif on it. I have had this for along time. Those lovely Japanese fabrics are so enticing, that they don't often need an excuse to come home with me.
I have used a Broken Dishes quilt pattern , made up of quarter-square triangle units, for the centre of the mug rug. I had a few 5" charm squares in cream, cut them into four and used them as the basis of the quickpiecing method outlined in the back of Katharine Guerrier's 'Scrap Quilt Sensation' book. They are quite little, so they were a bit fiddly.
This is now ready to wrap for a present swap rendez-vous this afternoon.
With that finished, I have just popped over to Bonnie Hunter's Quiltville Blog to see that she has Part 5 ready for us.  With this large ongoing project, it was nice to have a 'quick win', and something to share on Finish It Up Friday.

Friday, 14 December 2012

#4 Butterfly Quilt - What did I learn from this Quilt?

Each quilt I make, I tend to learn something new.  With the Butterflies Quilt being my first large project, over a long period of time, it was perhaps my steepest learning curve with regard to patchwork and quilting.  Looking back, I realise how naïve I was, and how this project really opened the doors to the quilting world for me.

Butterfly Quilt on the Bed English Paper Piecing
Butterfly Quilt on the Bed


English Paper Piecing is Great!
As long as the paper is cut to the right size, you can get away with rough cutting fabric, and along with hand sewing , you have much greater control of what is going on with your quilt - this is why I love working with the English Paper Piecing method. Also, cutting out the paper for quilts reminds me of cutting out dresses for paper dolls when I was a child.  I used to love this.  It is a quiet, peaceful pastime.  Sometimes I like to be on the machine, but when you have no choice in order to get a project done, it can feel like you are chained to it, and you really have to find a block of time to get the job done - not easy when you work full-time.  In the two years it took to complete the Butterflies quilt, I never once got frustrated with it.  It is portable.  You can fit it in to small gaps of time.  Just make sure you have it with you all the time!
Go With the Scraps
For this quilt project, the only fabric I bought was the cream calico and the fabric for the butterfly bodies.  Otherwise, I kept to what scrap fabric I had.  This led to, what felt like, some heavily compromised colour combinations, which made me wince as I sewed them together.  However, once the quilt was together, it looked perfect.  Go with the scraps, in general, they know what they are doing.
Thread
I used an off-white cotton to sew my pieces together, which worked for the majority of the quilt, but not so well on the coloured fabric.  As it travelled around with me  A LOT, just having to worry about one reel of thread, made it easier, however, with the quilts I have done since I have taken more care to match the thread to the fabric.
Quilting
This quilt needs more quilting.  I look at it every day and think this, but part of me is happy to keep it as it is, as a reminder that there is a ‘tipping point’ of too little, or too much quilting on a quilt.  I am still working on the balance of this.

Tuesday, 13 November 2012

#1 Butterfly Quilt - Inspiration Behind the Quilt


Butterfly Scrap Quilt Fabadashery
Butterfly Quilt by Frances Meredith
Inspiration
The inspiration for this scrap quilt came from a picture in a quilting book I took out of our local library, early in my quilting journey, about 2003.  The original picture in the book was no more than a couple of inches big, but it was enough for me to work out a pattern for a block.  I like a scrappy quilt, and this quilt used all sorts of fabrics.  At the time, the only patchworking I knew was English piecing, so I made my own paper pattern, cut out all the pieces, and off I went.

History of the Butterflies Quilt
During the period when I was making the quilt, I went to a JOAnn’s store, during a trip to America, where I saw a pattern of the same quilt being sold on the shelves. I guess it was only then that I realised that the quilt I was making already had a history.  Further research when I returned home to the UK revealed that a pattern, and the history of the quilt was published in a book “The New England Quilt Museum Quilts: Featuring the Story of the Mill Girls -Instructions for 5 Heirloom Quilts” by Jennifer Gilbert (Paperback,1999) [NB: Which I notice you can currently access via Google Books].  I discovered that it was originally made in about 1935, by a lady called Nina Shrock, Harvard County, Indiana, USA, using a design by Laura Wheeler. When we were back in America in the Autumn of 2007, we made a pilgrimage to the New England Quilt Museum, in Lowell, where we able to see the quilt on display, the one I had seen originally in my library book, back in the UK.  It was a nice feeling. I now have a pencil with the same butterflies on it, as a memento!

What fabrics did I use?
My creative journey has included dressmaking and embroidery, and it was only in about 2002 that I inherited a collection of beautiful quilting fabric and I considered doing some quilting. Amongst the collection were packets of fabrics, which I later learnt were called Charm Packs.  There were 5” squares, 4“ squares, and tiny 1.5” squares, mainly from a mail order company, Strawberry Fayre based in Chagford in Devon, UK.  I wanted a project that was going to use these up, and the scrappy nature of the quilt, seemed like the ideal choice. 
However, I did notice in the small picture that there were ‘constants’.  For instance, the body of the butterfly was the same for each.  I did not have anything suitable, so I went to my local quilting and patchwork shop, BusyBees, based in the Craft Units at Tredegar House in Newport, Wales.  There I found a brown batik fabric.  I was recommended to give it a wash before I used it. I think that was a good idea.  Otherwise, I didn’t wash any of the fabric – the bits were too small.

There is a whole mix in there.  Ironically, it was only after I had completed the quilt that it was brought to my attention that there were a lot of 30’s reproduction fabrics in it.  This was not intentional, it was serendipity at work.  At the time I didn’t realise what 30’s reproduction fabrics were.  I also have one or two bits of special fabric in there, including the first piece of fabric I ever bought, at the Marldon Apple Pie Fair in Devon, back in the early 1980’s.  You can see details of Techniques and Construction in this post.

Statistics
Dimensions: 243cm x 243cm (approx 8ft x 8ft)
Blocks: 64 blocks, 10” x 10”
Piecing Method: English Paper Piecing. Hand Pieced
Quilting Method: Hand Quilted
Dates: 2004 – August 2006


Awards:
2007 South West Quilters Award for Traditional Quilts, Quilts UK , Malvern
2007 ‘My First Bed Quilt’, Great Northern Quilt Show, Harrogate


#4 Butterfly Quilt - What did I learn from this Quilt?