Showing posts with label Pfaff Performance 2058. Show all posts

Friday, 5 April 2013

String Quilt Cat Mat - Easy Street Parking Lot!

Way back in January, I mentioned that I had plans to do a project with the scraps from my Easy Street Quilt, the online 2012 Mystery Quilt over at Quiltville.  However,  I woke up planning to do a machining project, and instead ended up with ALL my patchwork and quilting fabric out of my cupboard.  I had decided to reorganised my fabric stash. Several months down the line, I have revisited my original plans, and this week have produced a lovely new Cat Mat, which I am calling “The Easy Street - the Parking Lot”. 

String Quilt, Easy Street - The Parking Lot
In Bonnie K Hunter's book 'String Fling', she introduces her scrap user system, and a technique of using pages from an old telephone book as the foundation for stitching small scrap fabrics.  This was the technique I wanted to try out, but as my paper alternative, I had put aside the Christmas edition of the Radio Times, which by removing the centre staples has given me a double width of paper to stitch.  It has also highlighted to me how much of the Christmas period I spent on the Easy Street Quilt – I don’t  think I watched any TV!
2012 Christmas Edition Radio Times Cover Snowman Raymond Briggs
2012 Christmas Edition Radio Times - String Foundation Piecing
I did do a rough design in my Electric Quilt software, but I haven’t followed it slavishly, and instead have used my usual technique of muddling through trying to get everything the right size.  My colour scheme for Easy Street Quilt was Purple, Red and Green, with a Tan background, and most of my leftover scraps are pretty small, so my paper strips are only 3” wide. 
Easy Street Quilt Scraps Red Purple Green Fabadashery
Easy Street Quilt Scraps
Sewing the strips was easy on the machine, and I managed to get a production line going. I found it was better to remove the paper before tidying up the edges, as once cut, the stitching seam was not as strong to resist the ripping of the paper. 
String Foundation Piecing Pfaff 2058
String Foundation Piecing
As regular Followers will know, most of my work lately has focussed on hand stitching my Nearly Insane Quilt, so it seems like an age since I sat down at the machine (Note To Self: I really do need to set up a Leaders and Enders project, especially if Bonnie rolls out another Mystery Quilt at the end of the year!)  For the quarter square triangles, I tried to use the clever technique I used on my Broken Dishes Cat Mat, but my scrap pieces were too small and I had to cobble most of them together in a more ‘traditional’ method. 
Eventually, the quilt top came together, and was ready for quilting. 
I had some scrap polyester wadding to use, and I still had plenty of the Kansas Troubles 'Bound to the Prairie' fabric which I used for the backing on my Irish Chain Quilt, which I have used for the backing. Up close it is a lovely little print, but from a distance it looks like a murky porridge – however, murky porridge is good for hiding any less refined stitching when machine quilting…
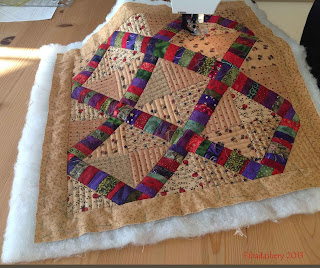
Quilt Sandwich being Machine Quilted Pfaff 2058
Quilt Sandwich being Machine Quilted
My actual Easy Street Quilt has yet to be quilted, and part of this project was to gain some strength experience of machine quilting to tackle this large project.  I was recently inspired by a little quilting video tutorial on the Green Fairy Quilts blog, by Judi Madsen, which although aimed at long arm quilting, highlighted to me the importance of marking your quilt, and planning the design head.  Also, I decided to abandon the worry of getting the tension right for free machine quilting, and stuck with using my straight stitch with the feed dogs up.   I went for a simple channels of stitching in the squares, rotating it by 90 degrees on each quarter. 
Quilt Detail Fabadashery
Quilt Detail
I think for this little quilt, the quilting has worked well, and enhances the pattern nicely – just as it should be.   This cat mat is only about 20 inches square, but manoeuvring it on my domestic machine was not as easy as you would want it to be, which makes me think – how realistic is it going to be to get the full size Easy Street Quilt under it?  I think I need to sit down and work out a design, and be realistic about how long it is going to take.  One assumes that using a machine means it will be quick, but I think on this occasion, I need to put that assumption to one side.
To finish it off, I pieced together some binding from the scraps, machine stitching it on the back, and hand sewing it on the front. 
Cat Kitty sitting on quilt
Suzi the Cat on the new Cat Mat
I am really pleased with how it has turned out, but think I have enough projects in this colour combination for now.  It did reduce the scraps, but there are still plenty more.

The good news is, the Quality Control Department has already signed it off.

Featuring Feline Friday and Crazy Mom Quilts!

Sunday, 6 January 2013

Bonnie Hunter's Easy Street Quilt - Part 8 (nearly)

As soon as I pressed 'Publish' on my last blog post, I returned to my sewing machine to continue with my Easy Street quilt, only to find it had gone on strike, and the little workhorse was not responding.  After checking the 'troubleshooting' section in the handbook, and all the online forums, I still had no luck, so yesterday it went to the Sewing Machine Doctor. I am waiting for the diagnosis ... Anyway, never fear, I pulled out my Husqvarna Designer 1 Embroidery Sewing Machine, and continued on that.  It works fine, but I had got used to the single needle plate, had sussed out my 1/4" seam allowance, and had wound a bunch of bobbins. And now I am having to work without it, I really appreciate the Pfaff IDT (duel feed).

There is nothing quite like a 'Link Up' to motivate you on a project, so knowing that everyone will be sharing their progress on the Easy Street Mystery Quilt on Bonnie Hunter's Quiltville Blog, here is my offering.
Bonnie Hunter's Easy Street Mystery Quilt
Easy Street Quilt - Block Layout
As you can see, all my blocks are complete, and this is the layout of the quilt.  As you may also see, at the time of writing, they have not been joined together, but probably by the time you read this, they will be!  Also, the instructions for Part 8 mention something about borders and a backing.  No plans yet, but you will all be the first to know when there are developments on that front.
Am I pleased with my colour scheme? Yes, I am.  Naturally, with hindsight and several hours on my Electric Quilt software, I might have changed a few things, but this was a mystery quilt, and I surrendered to the process, and enjoyed it thoroughly.

I always find with scrap quilts that you have to keep your faith in the scraps.  Sometimes a fabric may not feel right, but when mixed in with the rest,  it ends up being the essential 'player' which prevents the quilt looking bland. This was my 'not so sure' fabric.
I wanted to include it because of its whimsical sewing motifs, but it contained a little bit of WHITE, and it's background was insipid in contrast with my other warm toned fabrics. Turns out it is the one adding the much needed depth to the background fabrics.  On the other side of the coin, the 'Sing a Song of Christmas' print by Woodrow Studio, was the one which I had to hold back on.  With its pretty glitter, I wanted it all over, but I held back, and there is just enough to catch the light as the when quilt moves.
'Sing A Song of Christmas' Woodrow Studio Fabric
'Sing A Song of Christmas' Woodrow Studio
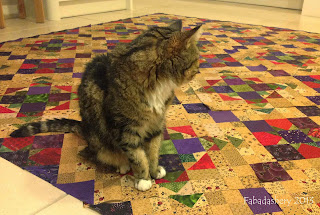
Today, I am also introducing Sparky, the other cat.  Sparky is not as interested as Suzi in the actual process of patchwork and quilting, but once he can see that all the activity is close to becoming a quilt to sleep on, he starts to take a very REAL interest.  There was a time when he would rolling around, rather than sitting on the quilt - I think he is thinking the same thing ...
Bonnie Hunter's Easy Street Mystery Quilt with Cat
Sparky on Easy Street

As a reminder, this is only my second machine pieced quilt, and my very first Mystery Quilt. I have really enjoyed the Mystery Quilt process, made all the better by sharing the journey with quilters all around the world.  Knowing that most of you have been working as hard as I have to get this done has really motivated me. return to work tomorrow, where I know it is going to be very busy, so I have been keen to get as much done on Easy Street as possible. You can see my progress for each part on the links below
A big THANK YOU to Bonnie for taking the time to plan it and put it together. You have made a lot of people very happy.
PS: Don't forget that Bonnie's instructions will be taken down from her site in June 2013.

Sunday, 2 December 2012

Bonnie Hunter's Easy Street Quilt - Part 2

 
Bonnie Hunter's Mystery QUilt  Easy Street Part 2 Flying Geese Units
Easy Street Quilt - Part 2 Flying Geese Units
Here are some of my 128 Flying Geese Units that are required for Part 2 of Bonnie Hunter's Easy Street Mystery Quilt.  I am using GREEN where Bonnie is using PURPLE at this stage, mainly because it is the colour I have least of.  My cutting seems to be OK, as my finished units are working out the right size.

Flying Geese Units - Strips
Already I am loving the way my colour scheme is working out. Here are some of the green strips I have cut out.  I have snuck in a sparkly fabric, "Sing a Song of Christmas" by Woodrow Studio, some Primitive Gatherings for Moda, and the 2002 Classic Cottons range, of which I seemed to have plenty.

I have made Flying Geese before, by a different method, and was quietly dreading the prospect when I saw the Easy Street Part 2 instructions on Friday, as before I had found that my corners frequently went down the black hole of my sewing maching, chewing up the fabric.  However, a MAJOR penny dropped when I realised I needed to use a single hole sewing machine plate, instead of a zig-zag plate. 

Pfaff 2058 Sewing Machine Zig Zag Plate and Single Hole Plate
I had read about it, but had never acknowledged its importance.  The next challenge was, how was I going to get hold of one in order to keep up with the weekly Easy Street Quilt tasks?  I didn't know what I was looking for.  Then another MAJOR penny dropped.  When I purchased my Pfaff 2058, it came with a bonus Quilters Toolbox.  But where was it?  I checked online to see what was included in the kit, and sure enough Pfaff included a single hole plate.  But WHERE was it?  I checked all the usually places, but with no joy.  Since buying the machine, we have moved house, and most of Friday and Saturday were spent pulling everything out to find this 2" square piece of metal.  Yes, I finally found it.  It was in the side pocket of sewing machine trolley. Sew far, sew good - no fabric down the black hole.  I also changed the blade in my Rotary cutter - that improved things too!

I don't follow Bonnie's Scrap User's System (a scrap in  my book starts when it is less than 2" square), but Suzi the cat and I watched her very informative video on her Quiltville blog, and decided to construct the Flying Geese Units in the same way.  Since we are meant to be shopping our stash, I also used the rulers I already had.  I prefer to use the Creative Grids range, and have the Multi-Size 45 / 90 degree Triangle for making Half and Quarter Square Triangles from Strips.  From what I can gather, this one ruler does what the Easy Angle and Companion Angle rulers do together.  I did a few samples, checking the lines I was following, and the units came out to be the right size.

Multi-Size 45 / 90 degree Triangle for making Half and Quarter Square Triangles from Strips, Creative Grids

 
Not all of them are sewn together yet, but most of the cutting is done. I had a few obstacles along the way. Here is Suzi the cat sitting on my cutting mat, just as I am about to cut another strip. You may be able to see the blur of her tail moving - this is usually moving within inches of the Rotary Cutter!
 

Monday, 19 November 2012

Christmas Countdown - Advent Calendar

Country Christmas Advent Calendar 107, Makower UK
"Country Christmas Advent Calendar", Makower UK
Whilst looking for scraps for the Easy Street Mystery Quilt, I came across this panel in my stash, #107 Country Christmas Advent Calendar by Makower UK.  I must have bought it at the Knitting and Stitching Show in Harrogate, several years ago, and several Advents have passed since then.  It has a pocket for each day, just big enough for a chocolate.  I am sure I have had it for 5 years or more. This is clearly a missed opportunity.  It must be AT LEAST 120 chocolates that I have gone without!  In an attempt to redress the balance, I thought I could get this ready for 1st December, THIS year.

It is a neat little project. Everything you need is there, including the instructions. Once the pieces have been cut out, the hems need to be folded back, pressed and sewn. 
Advent Calendar, Isamet 0500, Pfaff
Stitching the pocket hems for the Advent Calendar
With red and green pockets, there wasn’t really an ideal thread colour to use, so I opted for a gold metallic (Isamet 0500), to add to the glitz of Christmas. 
Box pleats for the pockets of the Advent Calendar
The 24 pockets are in strips, so they need to be folded to create a box pleat, and then attached to the main fabric panel.  So far, there has been more pressing with the iron than stitching, but all the pockets are attached, ready for a quilt sandwich, and the decision of whether to hand or machine quilt.

There are still 11 days to get this completed, within in which time Bonnie Hunter’s Mystery Quilt will have started.  I notice it will be 24 days since Bonnie made the announcement, maybe next year I can use the calendar to count down to her Mystery Quilt, and refill it for 1st December!