Showing posts with label Portable. Show all posts

Friday 15 February 2013

Nearly Insane Quilt - First Draw

The first blocks for the Nearly Insane Quilt have been drawn.  They are blocks
21 - 41 - 55 - 91
I have now printed off the blocks from the Electric Quilt 5 software and made up little portable packs with the cut up paper pieces, the fabric, and the instructions, for these particular blocks.  The drive behind this patchwork project is for when I am travelling, or I am out and about, and I need a small portable sewing project with me.  When I am at home I am MEANT to be catching up on my hand quilting backlog...
Nearly Insane Block Home Made Portable Project Packs
As I mentioned before, the fabric for the sashing and cornerstones have not been finalised, but I am realising that I should be doing these as part of my batch system, so that when the time comes to put the quilt together everything is ready to go.  Actually, I should also be doing some of the zig zag border too .... but I haven't chosen the fabric for that yet either.
What I have noticed is, that besides their number, these Nearly Insane blocks don't have names, so if you recognise any as we are going along, then please shout out any suggestions.

Monday 11 February 2013

Nearly Insane Quilt - Passport Packed!

Before you embark on a journey you need to make your travel arrangements, pack your suitcase with essentials, and arrange for someone to feed the cats.  These are the sort of preparations I have been making before my Nearly Insane Quilt journey.

1.  My guidebook on my Nearly Insane Quilt journey is Liz Lois book which has the templates for each of the 6" blocks, colour pictures of some completed Nearly Insane quilts, and along with some beautiful quilts on the internet, has been the inspiration for the journey in the first place.
Book: Nearly Insane Quilt by Liz Lois
2.  The type of journey I will be going on will be a hand pieced one.  It will largely be English Paper Pieced (EPP), but if there is heavy weather ahead, I am prepared for an alternative route using Foundation piecing.
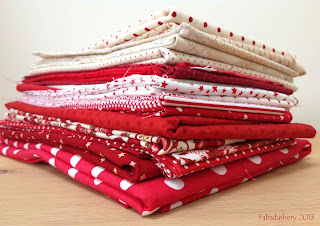
3.  The flavours I will be tasting will largely be red and cream, with some white fabric.  At the moment I have not made a final decision on the fabric for the sashing and the cornerstones.  At the moment the sashing is probably a cream calico and the cornerstones a solid red.  But like any good quilter, I will try to fit in a few 'fabric shop hops' along the way of my journey, where I hope to find something more appealing.

Red and Cream / White Fabrics for Nearly Insane Quilt
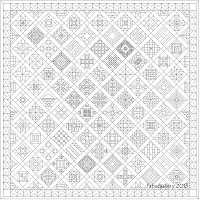
3.  My map on the journey is Electric Quilt 5.  I have already drawn out each block into the software, and set them into the quilt.  I have also scanned all my fabrics in, as a 'Nearly Insane Collection'.  This allows me to print off an accurate block for my paper pieces, and the shapes for cutting out the fabric.  It will also allow me to keep track of my progress, so I know how much of the quilt I have done, and how far I have to go.
Nearly Insane Quilt in Electric Quilt Software Fabadashery
Nearly Insane Quilt in Electric Quilt Software

4. To help decide which route I am taking I have set myself up a lucky draw.  I have cut up each block from the Electric Quilt print out of the whole Nearly Insane Quilt, numbered each block, and put them in a lucky dip bowl. For each draw I will randomly select 3 blocks, and 1 edge half block.  This will allow me to prepare the fabrics as I go along in a manageable way, and set them up in portable project bags, so there is always something ready to do on the go.

Nearly Insane Quilt - Lucky Dip Bowl Fabadashery
Nearly Insane Quilt - Lucky Dip Bowl
I think that is about everything for now.  I will be on this journey for quite a while, but I hope to send you all regular postcards!

Sunday 3 February 2013

Mini Hexagon Mug Rug

A Morris Tapestry Moda Fabric Hexagon Mug Rug
A Morris Tapestry, Hexagon Mug Rug
As you would have read in my last post, I have been aching to do some sewing this week, and finally I have managed it. Firstly, thanks to Sarah at Sarah Did It for the gentle nudge and inspiration for this Mini Hexi Project, which has kept me quiet for the past 24 hours. I wanted a little hand piecing project, using the English Paper Piecing method, AND I needed to produce a little birthday gift for this Monday, so this little hexagon Mug Rug fits the bill nicely.
English Paper Piecing Templates using Powerpoint
English Paper Piecing Templates in MS Powerpoint

The other night, whilst doing some work on the computer, I quickly popped into MS Powerpoint and drew up some paper templates. I found that the actual 'hexagon' shape in the package did not have equal length sides, so instead combined six equilateral triangles and some lines to make up the hexagons. The sides are 3cm each.

English Paper Piecing Hexagon Templates
I was travelling yesterday and NOT driving, so I seized the moment to start the project. This meant a rather hurried choice of fabric, so I played safe and went for a fabric range I had in my stash.  I was literally cutting out the fabric with my coat on, and the engine running on the car! 
A Morris Tapestry Fabric, MODA, 8172 8177 8176 8171
A Morris Tapestry Fabric, MODA,
(L-R) 8172-15, 8177-17, 8176-15, 8171-34) 
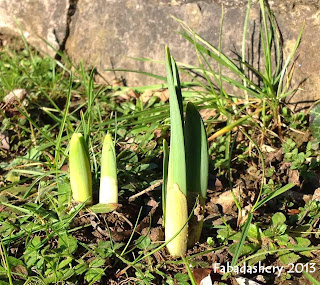
The fabric I chose was from 'A Morris Tapestry' by Barbara Brackman for Moda. They are reproductions of some William Morris (Arts and Crafts Movement) prints from about the 1890's, featuring the Strawberry Thief and a pretty Daffodil print. I thought this was appropriate because, it was a lovely sunny day here today and a chance to see the progress of the Spring DaffodiI bulbs - little way to go yet!  
Daffodil Bulbs February 2013
Daffodil Bulbs - February 2013
During the hour I had in the car, I was surprised to see that I had covered all my paper templates and that they were ready for stitching together.  I tend to use cheap tacking thread in a contrasting colour and stitch right through the paper.  It is the way I have always done it.  I like this method, as you never know how long it will be before you actually are going to stitch it together when you are hand piecing, so they can sit there for years without a worry.

But this project had to be done today. After a little thought, I decided that the easiest way to construct the little Mug Rug was to do it in columns, this avoided any awkward seams, and you can see here the different stages.
With only tiny pieces, it did not take long to piece together, and in no time at all it was time to take the paper out.  This is a picture of the reverse of the mug rug, after it was stitched together, but with the paper still in place.  I tend to give  projects like this a good press whilst the papers are still in place - I find it helps to keep their structure.

Hexagon English Paper Piecing - Reverse
With the papers removed, I pressed out the seam, and made up a quilt sandwich from some scrap wadding, and some fabric for the reverse.  I just did some simple hand quilting, outlining the shapes. If I am hand piecing and hand quilting an item, I usually like to keep the integrity of the piece by banning ALL machine stitching, but lately, once the top is quilted, I have started to machine stitch the edge, to stay stitch the quilt sandwich, which will then be hidden in the binding. I used a straight edge binding.  Again, for this little project I did use the machine to sew on the binding, and then hand stitched it on the reverse. 

Hexi-Puzzle Mug Rug - English Paper Piecing
The good news is that the gift is completed in time, and that I still have the rest of the day to do some stiching!  If you enjoy hand piecing, especially Hexagons, Sarah Did It has a special Hexi Link Up on the 17th of each month - do be sure to join in!
Today I am linking up with Connie at Freemotion By The River and Crazy Mom Quilts.


Wednesday 9 January 2013

Pies and Tarts Quilt - English Paper Piecing

Pies and Tarts Quilt Navy Background Scrap Quilt
Pies and Tart Quilt
Along with piecing my Easy Street Mystery Quilt over the holidays, I have also managed to complete the quilt top for my Pies and Tarts quilt.  This has been a hand piecing project for the past few years, started in February 2011.  The last few bits should have only taken about half a day to do, but Easy Street has rather taken over. When you are hand piecing, completing the top is a major milestone, so I thought I would share this with you.

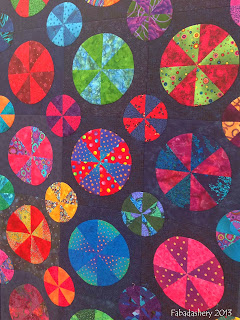
I was also trying to use my stash and create a scrappy quilt, so I made up some slightly larger cardboard pies and tarts templates from cereal packets, adding on for the seam allowance, for the pies and smaller tarts to draw around for my fabric shapes.  I did a whole 'Pie' and some different sized slices to accommodate some fussy cutting and to use smaller scraps.  I found that a 5" charm square was the perfect size to fit the fabric template for a 'tart'.  As a result of all this circular cutting, a quick sift through my current stash will find fat quarters with awkward round holes in them - no neat strips for this project!

Because I only had a limited number of paper patchwork templates, I tended to cut the fabric in batches, pairing up colour schemes for each circle as I went along.  With a little bag of paper templates, some colourful fabrics scraps, and a needle and cotton, I was on my way.  It travelled with me everywhere, and gradually the Pies and Tarts quilt accumulated.  There are a variety of textured background navy fabrics used in this quilt.

Pies and Tarts Quilt Detail Bright and Navy
Pies and Tarts Quilt Detail

The construction of each block roughly went a bit like this
1. Tack fabric around paper templates
2. Select two sets of four coordinating 'slices'
3. Sew up four pairs of the two colours, overstitching them together
4. Sew the four pairs to make a circle or 'pie'
4. Press the completed circle to ensure a smooth circular edge
5. Applique circle onto a 8" square of navy fabric, removing paper templates as you go.


Pies and Tarts Quilt Navy Background Scrap Quilt
Pies and Tarts Quilt Top Completed
It was only once four blocks were pieced together (by hand, of course!) that it was possible to apply the smaller tart in the middle.  With the verticals and horizontals of the blocks, it was easy to place the circles in the same direction, which adds a diagonal pattern to the whole quilt as well.  I have added half circles to the edge, and to finish the edge I will be adding a very narrow navy border.

At this stage I am joining up with Finish It Up Friday  and HeLP for Hexiaholics - the next stage is to put it away for a while whilst I decide on the quilting pattern I will use, and it waits its turn to be hand quilted ....


Friday 14 December 2012

#4 Butterfly Quilt - What did I learn from this Quilt?

Each quilt I make, I tend to learn something new.  With the Butterflies Quilt being my first large project, over a long period of time, it was perhaps my steepest learning curve with regard to patchwork and quilting.  Looking back, I realise how naïve I was, and how this project really opened the doors to the quilting world for me.

Butterfly Quilt on the Bed English Paper Piecing
Butterfly Quilt on the Bed


English Paper Piecing is Great!
As long as the paper is cut to the right size, you can get away with rough cutting fabric, and along with hand sewing , you have much greater control of what is going on with your quilt - this is why I love working with the English Paper Piecing method. Also, cutting out the paper for quilts reminds me of cutting out dresses for paper dolls when I was a child.  I used to love this.  It is a quiet, peaceful pastime.  Sometimes I like to be on the machine, but when you have no choice in order to get a project done, it can feel like you are chained to it, and you really have to find a block of time to get the job done - not easy when you work full-time.  In the two years it took to complete the Butterflies quilt, I never once got frustrated with it.  It is portable.  You can fit it in to small gaps of time.  Just make sure you have it with you all the time!
Go With the Scraps
For this quilt project, the only fabric I bought was the cream calico and the fabric for the butterfly bodies.  Otherwise, I kept to what scrap fabric I had.  This led to, what felt like, some heavily compromised colour combinations, which made me wince as I sewed them together.  However, once the quilt was together, it looked perfect.  Go with the scraps, in general, they know what they are doing.
Thread
I used an off-white cotton to sew my pieces together, which worked for the majority of the quilt, but not so well on the coloured fabric.  As it travelled around with me  A LOT, just having to worry about one reel of thread, made it easier, however, with the quilts I have done since I have taken more care to match the thread to the fabric.
Quilting
This quilt needs more quilting.  I look at it every day and think this, but part of me is happy to keep it as it is, as a reminder that there is a ‘tipping point’ of too little, or too much quilting on a quilt.  I am still working on the balance of this.

Saturday 17 November 2012

#2 Butterfly Quilt - Techniques and Construction


Butterfly Quilt English Piecing Blocks
English Paper Piecing the Butterfly Quilt

Construction
The Butterfly Quilt was hand pieced, using the English Paper Piecing Method.  This involves tacking each piece of fabric over a paper template, to give it shape and structure, and then sewing the pieces together.  I tend to leave all the paper in until the top is complete, again, to keep its structure.  I find that this method leaves me with a dead flat top at the end. 

This was a great project.  I spent hours playing with fabrics from my stash and choosing the colour combinations.  It was a great portable project too.  I used my train journey to work to cover paper templates and piece blocks, and it went on many car journeys, as well as holidays to Amsterdam, France and the USA.  This is where all the action took place, and without a fuss, quietly the blocks came together. Once the blocks were together I decided it needed a border to frame it.  I pieced 2.5” x ¾” strips together out of the scraps, and that made up the border, along with calico borders. In a large quilt like this, don’t underestimate how long it will take to remove the paper templates!  For the back of the quilt, I used the same cream calico as on the front.
 
Before I put the sandwich together I needed to add the 64 antennae. The antennae of the butterflies are hand embroidered, using a backstitch, in a regular stranded embroidery cotton.

The wadding in the middle is 100% polyester.  All I remember about it is that I wanted one piece of wadding, and with the large quilt, my choices were limited.  I had also previously had a BAD experience hand quilting cotton wadding, which ‘bearded’ on a navy background, so I knew I wanted to give that a wide berth.  Having used the quilt daily for several years, I still really like the feel of it.
Quilting
When it came to the quilting, I knew I wanted to hand quilt it, but I didn’t know where to start.  As the top gradually came together, I knew I had to do something about it, so I booked onto a
Sandie Lush Hand Quilting Workshop, at Busy Bees, in Newport. That was a brilliant class, and I left with the confidence to start quilting the Butterflies Quilt.  I didn’t know what to quilt on it, so I made up my own pattern (not without MUCH deliberation), having outlined the butterflies, and ‘stitched in the ditch’ of their bodies.  I remember quilting this quilt quite distinctly. It was July and August in 2006.  It was HOT.  And I was underneath a quilt, hand quilting.  I was quilting to a deadline – I had entered it into the NEC Festival of Quilts in Birmingham, so it had to be done, ready for delivery in August.  Without the deadline, I think I would have done more quilting on it. 
Butterfly Block Scrap Quilt
Example of Butterfly Quilt Block
Once complete, I washed it in the washing machine.  I had been dragging this quilt around with me everywhere for a couple of years.  The cat had regularly sat on it whilst I quilted, and the heat of the summer meant that more recently, it had taken the brunt of my perspiration.  It washed up a treat on a 40 degree wash, and luckily the sun remained out long enough for it to dry outside on the washing line. However, almost immediately, it was packed up and taken to the depot where they were collecting the quilts for the show.  I was missing it already.
Further information about the Inspiration Behind the Butterfly Quilt can be seen in earlier posts.